Introduction
Many people struggle to navigate the vast options in health and wellness, which can feel overwhelming. The LifeWave patch placement chart provides a clear guide to help users make informed choices about harnessing the power of phototherapy for enhanced vitality and well-being. By following this guide, individuals can unlock the full potential of these innovative patches.
If the placement doesn’t yield the expected results, it’s important to explore the nuances of proper application. By understanding proper application and addressing common issues, you can maximize health benefits and reach your wellness goals.
Understand the Purpose of the LifeWave Patch Placement Chart
The lifewave patch placement chart is a vital tool for users, guiding them on how to use devices effectively for optimal health benefits. These adhesives harness advanced phototherapy to help your body heal naturally, and placing them correctly can really boost their effectiveness.
For instance, when you place an adhesive over specific acupuncture points, it enhances energy flow, aids recovery, and promotes overall wellness, including better sleep quality and increased vitality.
Studies indicate that when applied correctly, these adhesives can lead to significant health improvements, with many users experiencing better cellular repair and regeneration.
By understanding how to use these applications and following the lifewave patch placement chart, you can truly unlock the potential of your health and well-being with LifeWave’s innovative solutions.

Access and Interpret the LifeWave Patch Placement Chart
Many users feel uncertain about where to place the patches for maximum benefit, which can lead to frustration and missed opportunities for wellness. To access the LifeWave patch placement chart, visit the official LifeWave website or refer to the product packaging. This chart showcases detailed illustrations of the human body, helping you identify the best areas for application.
As you look at the chart, remember that following the specific guidelines can really help you get the best results for each type. For instance, the X39 adhesive, known for its advanced phototherapy technology, is often recommended for placement on the back of the neck or over certain acupuncture points. Understanding these placements can help you make the most of your wellness journey.
Users just like you have found that sticking to these guidelines leads to better sleep and more energy. Proper application techniques, like ensuring your skin is clean and dry, can further enhance the effectiveness of the treatment. LifeWave suggests using one X39 adhesive daily to improve your outcomes.
By getting familiar with the LifeWave patch placement chart and adhering to the suggested placements, you can create a personalized wellness routine that aligns with your health goals. Additionally, consider incorporating the Cellergize™ product line into your regimen for targeted nutritional support, enhancing your overall wellness journey.

Apply the LifeWave Patches According to the Chart
Are you ready to enhance your wellness journey with effective adhesive application?
- Prepare Your Skin: Start by ensuring that the area for application is clean and dry. Getting your skin ready is key to seeing the best results. Avoid lotions or oils, as these can hinder adhesion and effectiveness.
- Select the Correct Option: Use the lifewave patch placement chart to choose the option that aligns with your wellness goals. For example, the X39 product is suggested for energy enhancement and overall vitality, utilizing LifeWave’s innovative phototherapy technology.
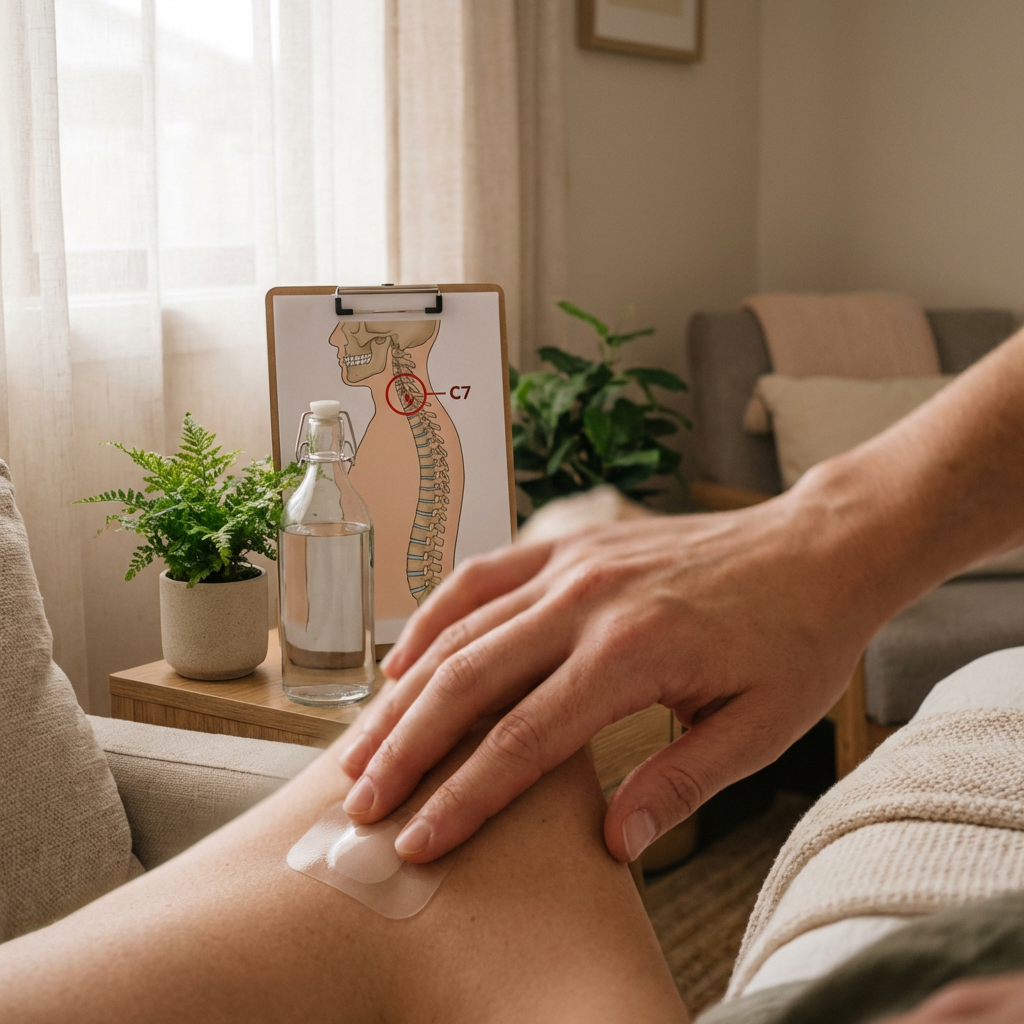
- Placement: Carefully peel the backing off the adhesive and apply it directly to the skin at the specified location. According to the lifewave patch placement chart, if it suggests placing the X39 adhesive on the back of the neck, position it over the C7 vertebra for optimal results.
- Press Firmly: Ensure the adhesive material adheres securely by pressing it down firmly for a few seconds. This step is crucial to maintain contact with the skin and improve the effectiveness of the adhesive.
- Duration: Wear the adhesive for the recommended length of time, typically up to 12 hours, before taking it off. Adhering to this guideline helps maximize the advantages of the update.
- Hydration: Make sure to drink plenty of water while using the strips. Aim for 16 to 20 ounces each morning before you apply the adhesive to help boost the treatment’s effectiveness. Staying well-hydrated supports your body’s natural healing processes and enhances your overall wellness. Remember, taking these simple steps can lead to a more fulfilling wellness experience.

Troubleshoot Common Issues with Patch Placement
Experiencing issues with adhesive products can be frustrating, but there are simple steps you can take to improve your experience.
- Adhesive Not Sticking: To enhance bonding, make sure your skin is clean and dry before applying the adhesive. If you find it keeps coming off, don’t worry – trying a different spot on your body might help it stick better. Some areas may provide better adhesion due to less movement or friction.
- Skin Irritation: If you notice any redness or irritation, it’s best to gently remove the adhesive strip to avoid discomfort. It might be helpful to apply it to a different location. If irritation persists, consulting a healthcare professional is a wise choice to rule out any underlying issues.
- Insufficient Results: If you’re not seeing the benefits you expected, let’s take a moment to check its placement against the lifewave patch placement chart together. Ensure you’re using the right adhesive for your specific wellness needs, as different options target various issues.
- Bandage Slipping: If your bandage slips or comes off, don’t worry – applying it to a more stable area, like your upper arm or back, can help it stay in place better.
- Duration of Use: To keep your patch working its best, try to stick to the recommended wear time of up to 12 hours. Regularly rotating application sites can also help prevent skin sensitivity and irritation, ensuring a more comfortable experience. By following these guidelines, you can ensure a more comfortable and effective use of your adhesive products, allowing you to focus on what truly matters.

Conclusion
Navigating the world of health solutions can feel daunting, especially when it comes to new products like LifeWave patches. Mastering the LifeWave patch placement chart is essential for anyone looking to enhance their health and well-being through effective adhesive application. When you understand what these patches do and follow the guidelines, you can enjoy significant health benefits, including improved energy flow, better sleep quality, and overall vitality.
Throughout this guide, we’ve shared key insights on how to access, interpret, and apply the LifeWave patches effectively. From preparing your skin and selecting the right adhesive to troubleshooting common issues, each step is designed to optimize your experience and ensure that the patches deliver their full potential. Remember, adhering to the recommended practices, such as proper placement and hydration, can greatly enhance your results.
Many people feel overwhelmed when trying to navigate new health solutions, unsure of how to start or what to expect. However, when you embrace the LifeWave patch placement chart, you’re taking an important step in your wellness journey. By integrating these innovative solutions into your daily routine, you can experience transformative health improvements. By taking these steps, you’re not just using a product; you’re investing in a healthier, more vibrant future for yourself.
Frequently Asked Questions
What is the purpose of the LifeWave patch placement chart?
The LifeWave patch placement chart is a tool that guides users on how to effectively use LifeWave devices for optimal health benefits by indicating proper placement of the patches.
How do LifeWave patches work?
LifeWave patches utilize advanced phototherapy to help the body heal naturally, enhancing energy flow and promoting overall wellness when placed correctly.
What benefits can users expect from correct patch placement?
Correct patch placement can lead to enhanced energy flow, improved recovery, better sleep quality, increased vitality, and significant health improvements, including better cellular repair and regeneration.
Why is it important to follow the patch placement chart?
Following the patch placement chart is important because it helps users unlock the full potential of LifeWave’s health and wellness solutions by ensuring the patches are applied in the most effective manner.
List of Sources
- Understand the Purpose of the LifeWave Patch Placement Chart
- Anleitung zur Anbringung der Pflaster – LifeWave (https://lifewave.com/lifewaveinc/home/patch-placement-guide)
- oxycell.com (https://oxycell.com/science/red-light-therapy-statistics?srsltid=AfmBOorGN4QuBK-mHYTHuvku1E_xRBlo3a9okO4mF8fmrijD6nEKyVKy)
- LifeWave Patches: What Does The X39 Really Do? – Liv Hospital (https://int.livhospital.com/lifewave-patches-what-does-the-x39-really-do)
- finance.yahoo.com (https://finance.yahoo.com/news/phototherapy-treatment-market-surpass-us-082500860.html)
- Access and Interpret the LifeWave Patch Placement Chart
- megangrahambeauty.com (https://megangrahambeauty.com/blog/lifewave-x39-patch-placement)
- books.google.com (https://books.google.com/books/about/LifeWave_Patch_Protocols_and_Placement_C.html?id=vit30QEACAAJ)
- Anleitung zur Anbringung der Pflaster – LifeWave (https://lifewave.com/lifewaveinc/home/patch-placement-guide)
- LifeWave Patches: How Long To See Results? – Liv Hospital (https://int.livhospital.com/lifewave-patches-how-long-to-see-results)
- Apply the LifeWave Patches According to the Chart
- Anleitung zur Anbringung der Pflaster – LifeWave (https://lifewave.com/lifewaveinc/home/patch-placement-guide)
- megangrahambeauty.com (https://megangrahambeauty.com/blog/how-to-start-lifewave-x39-patches-guide)
- megangrahambeauty.com (https://megangrahambeauty.com/blog/lifewave-x39-new-user-tips)
- grandviewresearch.com (https://grandviewresearch.com/industry-analysis/transdermal-skin-patches-market-report)
- fortunebusinessinsights.com (https://fortunebusinessinsights.com/transdermal-skin-patches-market-102493)
- Troubleshoot Common Issues with Patch Placement
- megangrahambeauty.com (https://megangrahambeauty.com/blog/5-lifewave-x39-mistakes-uk)
- Common Problems With Transdermal Patch Delivery and Adhesion | Strouse (https://strouse.com/blog/transdermal-patches-release-medication)